Thursday, January 26, 2012

Kites in January!

Say what?! Yes, as most of the midwest is experiencing above average temps, so is Colorado.  Even if we get a little dusting of snow coming down from the  mountains, it has not been sticking due to the sun and temps in the 50's.  Over this last weekend, the high was 60, and it was VERY windy.  Perfect for kites.


 It was amazing to see how excited these two girls were over watching something float in the air above them.


 Fly kite!  Fly!!!!  We can help you!!!

 This nice, and genuinely happy man was there with his family.  He called the girls over to help him fly his, bigger, fancier, cooler kite.  They took turns holding and steering the kite.  He seriously laughed as the girls held on with all their might to this large kite that was flying higher than ours ever did.  The girls were in awe.

We can never leave this park with out a little playground play.
 She is spinning.  She loves it; giggles the entire time.  When she gets down, she can't walk straight, stumbles, and maybe appears to have had a spiked drink of some sort.

Stella is becoming quite the climber and her balance is only improving with gymnastics.  But, does anyone else get extremely nervous when their child climbs to the top of the jungle, octagon, tower thingy?

p.s. Since the girls enjoyed the kites so much, we did buy a better one!

Wednesday, January 25, 2012

Large and Cheap!

I have been wanting a large piece of art for above our fire place.  There are two grates on the wall above the mantel and no matter how I decorate, it still looks busy to me and kind of ugly.  I have found pieces I like,  BUT they are expensive.  I have a big problem with investing in things to fit a space that is temporary.  What if I can not find the perfect space to fit my new nice art when we eventually move?  So, of course, I did a little pinterest searching.  I found a few ideas I liked from three different bloggers, and sort of meshed them all together.

First...Home Depot scrap pile! I bought four pine scraps for $2.00.  Then I picked out a gray color for and little sample paint pod.
When I got home, I put my boards together with some screws from our "tool junk" and wood glue.  This is one of the ideas I got from another blogger. This is my canvas.

I then put a coat of white spray paint on the front and sides for a sort of primer coat. Scrap boards are marked green sometimes and I wanted to make sure that did not bleed through. Plus, I had not decided if I was going to distress this.  Yes, I spray painted with a little snow on the ground.

I covered it with my gray sample paint.

Once, that dried, I taped off some trees.  This is the second idea, I borrowed from another blogger...the style of the trees.  I liked the idea of the mix of modern, sharp trees on the rustic canvas.

I then painted with some acrylic craft paint I have.  Here is the third borrowed idea.  Different shades of the art for some depth and texture.  Now the original idea involved different shades of the same color and multiple applications over TIME.  I do not have that kind of patience.  For me, that means multiple nap and after bed times.  I, instead, did two-three coats of paint on the trees and chose one tree to only have one coat.
 Once that was dry (10 min), I lightly sanded the trees horizontally to give the trees more texture and a bark like effect.  I loved how the pine grain came through a little as well.

Final result:
 I really LOVE it. Ugly, unused grates covered.  Cool art displayed.  And I spent just over $5! (I had most of the supplies already.)

Monday, January 23, 2012

Fun in the Sun/Snow

In the Sun or in the snow?  Best of both worlds here in the backyard.
 Let's stomp in the snow!

 Or, let's dig in the Sun!

 Callie is just happy to have someone in her domain.  "Sure, climb on, I will show you around."


Friday, January 20, 2012

Art Display

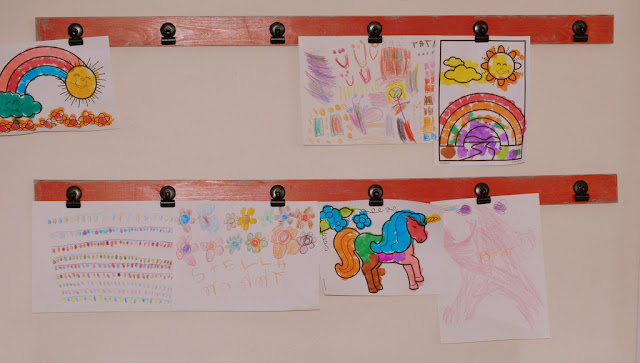
Ok, project time.  I have seen several different versions of this and have always wanted to make it. I have a big blank wall and realized this project would be perfect to fill space, de-clutter my fridge and keep tape off the wall.  Ready? Here it is...


Very inexpensive, and I really, truly love it.  So do Ben and the girls, especially Stella.  
A little how to explanation?

 First Stop: Home Depot. I bought an 8 ft birch strip of wood (3 in wide) for under $5 and had the saw it in half.  Now, I could have saved money, even would have gotten pine, if I had bought the 50 cent scraps.  But (!), they only had 4 in strips and I was feeling particular about the 3 in. 

 Since, I did get a cheaper type of wood,
 I lightly sanded it removing the rough spots around the knots and edges.

 Then I painted it with paint we had on hand.  It was either black, white, or red.  Knowing this would eventually go in a play room when we move, I went bold!

 Once dry, I screwed on the frame hangers.

 Next up for supply list.  I chose regular bulldog clips, but they make different kinds now, extra large, square, colored, etc.
 As you can see, I spray painted mine.  I thought they were a bit too shiny for the bold red.  Then I measured out where I wanted them and Gorilla Glued them on.

 I couldn't help it.  I am very particular about distressing things.  It has to be the right piece and there can not be too much in one room.  I had this sample paint left over from a year ago and it was love at first sight.
Voila!  Now, had I not insisted to myself that the clips needed to be painted, this project would have been under $15!!! Had I found wood scraps I liked, it would have been under $10!!! Now go...go to Home depot and make a mini one or an extra large one for your office, or kitchen. 
 I think if you took the time to layer the wood to make it look like molding, it would be pretty snazzy in an office holding reminders, calendars or photos.  Right?!


Thursday, January 19, 2012

Ice Ice Baby

My Mom came to visit a little while ago and we took the girls ice skating.  One in four of those with blades of glory on had actually been ice skating.  I have been plenty, but decided maybe it should be on the list of things not to do when you are pregnant.  I opted for picture taking instead.  The girls LOVED it.  They were terrible, not graceful at all, BUT kept on going. Esme shuffled her feet along veeeerrry slowly.  Every time they passed the gate, I would go to meet my Mom or Ben to retrieve a child.  I was surprised to find every time, either Esme would cry and kick "No!" Stella would just keep sliding along...singing her song.  Pete the cat anyone?
 Stella would occasionally use the walker.  Mom may have too. Ha.


 Then there is Esme.  If she could have, I think she would have left Ben behind.  
She does not accept help easily.

 You only see the good shots.  This little girl fell so much, I was convinced 
her bum would be blue the next day.  It wasn't.  I was sooooo proud of her.  She kept getting up after every fall, ready to go more. 

 She bit it right after this picture.  Stella did.

 So much fun!  Wheeeee!  

 Concentration faces are the best.  


 After Esme came to sit with me, this trio worked out very well.
 Sorry, too pretty not to post.

And finally...the two ice princesses who have been asking to go again. Side note, Esme was making this face on purpose.  The thought it was funny.

Friday, January 13, 2012

ABC's

I completed some sewing projects right before Christmas, some for the girls, some as gifts.

We had left over white shirts from our family photo/Christmas card.  I NEEDED to put something on them.  I mean, seriously, my girls can never keep a white shirt...white.  But, they love wearing their letters.  
Esme calls it her "E for Esme" shirt.

I love sewing these for gifts to new little ones. 
I also completed some number tees, but did not picture them. 

Would you buy these?  

Wednesday, January 11, 2012

My Oopsy Daisy

Okay...I think it is only fair I share my mistakes.  I get so excited to show you my projects and how easy things are to do yourself...I never show you my trial and errors along the way.  Oh, and there are some.

I had such great luck with RIT dye for Halloween, I thought I would try it on Stella's curtains.  Wait, let me back up and give you the long story.  I finally broke down in October and painted some walls.  I painted any wall that had this terrible yellow on it.  The catch is, most likely I will have to paint it back before we move, so I am keeping it to a minimum.  After watching me paint a couple rooms, Stella started begging for a pink room.  Nope, not going to do it.  If I do Stella's room, I have to do Esme's, and then I have two more rooms to paint back. Soooo...I thought it would help if she had MORE pink to settle her want.  The curtains she had in her room were actually really pretty and really cute shower curtains I picked up from Target on clearance.  It is hard to want to invest in things like window treatments, when these will not be the windows she will have say in a year.  Now, back to the RIT dye.  I thought I would give it a shot and see if it worked.
Well, it didn't.  I mean BIG did not.  These were once a pretty light aqua blue with light pink flowers.  
Here, they are a purple-y, pinky, blah, yucky yuck mess.  
What was I thinking, right?  Well I wasn't.  I should know better with a pattern especially.
Stella loved them; even cried when I started to redo them.
Bleh.

I bought some pink canvas from JoAnn's with a 50 percent off coupon and got to sewing.  Since the original curtains were shower curtains, I had picked some fun "sparkle" rings to hang them on.  I wanted to reuse these knowing how much Stella liked them.
I actually sewed the tops of the original curtains to the fabric on the back side so that the new curtains could hand the same way on the same rings.  I did not have to worry about creating any holes
 this way and also keep mistakes hidden.

So much better.  Of course the little one here, took the opportunity to bounce on her sister's bed while I was taking pictures.  Stella has gotten over her loss and now loves her new curtains...since they make her room glow pink when they are pulled shut.